
Overview: This utility, in conjunction with the Learning Stream Registrant Database module, allows you to restrict registration for an event to certain people, or groups of people. If you are not using the Registrant Database, the Restriction options do not apply.
Event Setup > Restrictions
Event Access Restrictions - Here you can specify the registrant login requirements for a specific event.
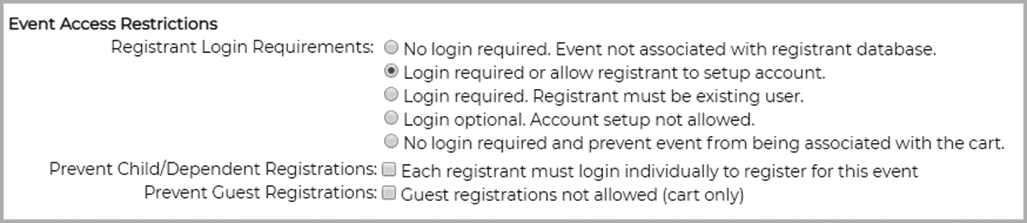
You have five choices for Registrant Login Requirements:
- No Login Required. Event not associated with registrant database.- Choose this option if there are no restrictions on individual registrants for the event.
- Login required or allow registrant to setup account.- Choose this option if you want to restrict the event by only allowing registrants with an account, or new registrants who create an account, to register.
- Login required. Registrant must be existing user.- Choose this option if you want to restrict registration for an event only to those registrants who already have an account and are registered in the database.
- Login optional. Account setup not allowed.
- No login required and prevent event from being associated with the Cart.- Use this option for an event if 1) you use the Cart for any of your events, and 2) this event is not associated with a cart. Otherwise, the event will be associated with a cart even if it doesn't appear on a cart calendar or listing.
Additional options include:
- Prevent Child/Dependent Registrations: Each registrant must log in individually to register for this event. - Applies to the cart only. Dependents within an account would have to log in separately to register.
- Prevent Guest Registrations: Guest registrations not allowed (cart only)- This overrides the guest registration setting for a cart.
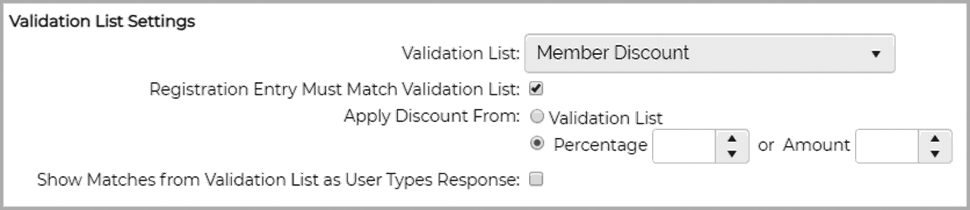
Validation List Settings
Upload a list of potential registrants, such as organization members or employees, and then restrict registration to those on the list, or apply discounts to them.
Video Validation List Setup
- Create and upload a list under Admin
- Under Event Setup>Restrictions in the Validation List Settings section choose the list from the Validation List dropdown.
- If you are applying a discount to a registration, either apply it from the validation list or add it directly to the event. Discounts associated with the registrant on the validation list at the Administration level override those applied at the event level.
- If not validating by name or email address, choose a registration question as the validation. For example, if a membership number is being used as validation, and is a required field, the registrant must accurately enter the number on the registration form.
- If the membership number used in this example were not a required field, registrants would still be able to complete the process if they entered nothing in the membership number field, but they would not get a discount.
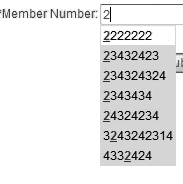
Validation List Autofill
To activate the autofill feature for validation fields:
- Define a Validation List in Administration. The Validation Type must be defined as 'Other'.
- In Restrictions for your event, assign your validation list and a registration question (text field entry only).
- Check 'Show Matches....'
* 15 matches will be shown at a time; matching text will be underlined.
* Registrants can scroll through the list with arrow keys or click the navigation arrows.
An error message will be displayed if registration is restricted to the validation list and the registration fails. The incorrect field (email, name, or registration question) will be flagged with the warning icon.
If a discount is applied, it will be classified in billing records as a "Validation Discount."
If both a discount percentage and amount are specified, the percentage will take precedence
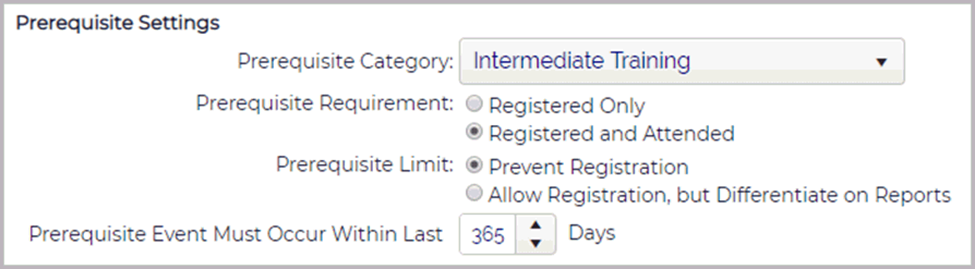
Prerequisite Settings
How to Apply a Prerequisite (Enterprise version only)
You can prohibit a person from registering for an event if that same person has not already registered for (or attended) another event in Learning Stream. The prerequisite settings are based on categories. A category can be created for an individual class or class opportunities. For example, a category could be "Online Registration 101". A person could not sign up for "Online Registration 102" unless first registering for and/or attending 101 within a set time frame. The prerequisites are set in the second event.
- Activate via Application > Account > Features. You must check the boxes for Database Module and Prerequisites. If you had not previously activated these features, you will have to log out and then in again once you have turned them on.
- Create a category specific to the event that is the prerequisite (first) event.
- Associate the prerequisite event with the category.
- On the 2nd event, go to Event Setup > Restrictions.
- In the Prerequisite Settings section, choose the category that is associated with the prerequisite (first) event.
- Choose the prerequisite requirements and limits.
- If the prerequisite must be met within a certain time frame, enter the number of days. A zero signifies the prerequisite event could have been met at any time
- If you prevent registration, the message "Prerequisite requirements to register for this event have not been met." will appear when the registrant tries to submit the completed form.
- If you want to allow registration even if a prerequisite has not been met, you will find a prerequisite met column option on the event's Custom Registrant Listing reports.
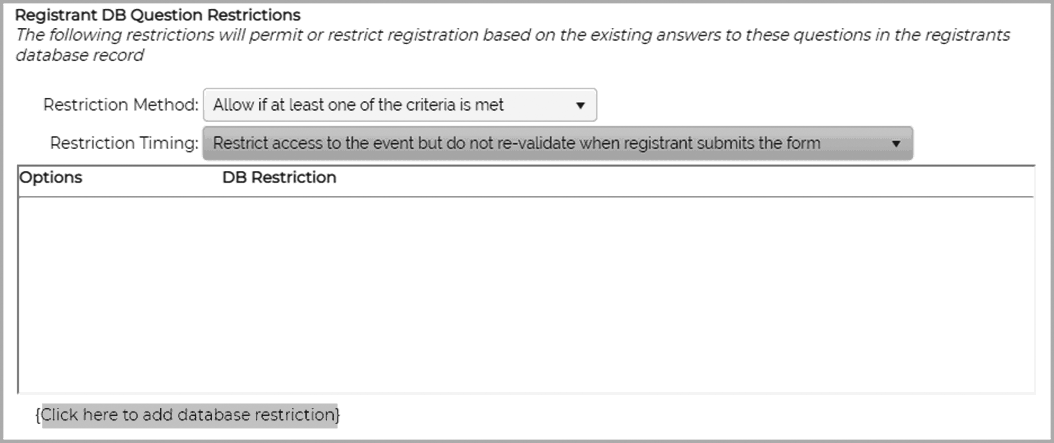
Registrant DB Question Restrictions
- Global questions tied to Registrant Database records can be used to restrict sign-ups.
- Choose if you want to allow only records with specific answers to one or more global questions, or block them.
- "Click here to add database restriction."
- Select one or more global questions and answers to use for restrictions.

When a restricted registrant tries to sign up, they will see this message on the event log-in screen: Registration not permitted for this event.
If you have set up discount levels in Administration > Discounts > Discount Levels, the levels can also be added as restrictions.
Group Registration (Legacy Feature)
You cannot use the database with this feature enabled in an event. Registrants are not allowed to create an account and log into their account when they register. Events will not be tracked in a database record.
Learning Stream strongly recommends the cart process (Application > Interface) as a more flexible way to handle group registrations.
If you are using the Learning Stream Database module in which you can require individuals to log in with a user ID and password before registering, the group registration option will not be available for that event.
Email Group Contact Only - With group registrations, one contact person initially completes the registration forms for every group member. With this option, only the contact will receive notifications. Only the contact will be able to update, add or delete registrants. Otherwise, all registrants will receive notifications.
Default Group Name: This option may be most appropriate if a "group" is a family. The family name will appear as the group name, rather than the name of the main contact's organization.
Allow Group Members to Change their Registration: If individual members of the group receive notifications, you can allow them to update their forms as needed.
Use Group Discounts - In addition to allowing group registrations, you can trigger price breaks based on the number of registrants within a group.
Discount Amount: If, for example, you want to give a price break of $10 for every registrant after the first one, you would enter "2" (signifying
the second registrant) for the quantity break and $10 for the Discount Amount. If you anticipate more than two registrants in some groups, you
would continue to build out the discount levels. For example, enter "3" and "$20", "4" and "$30", etc. so that each additional registrant
receives a $10 discount.
Discount Percentage: This option may work best if you want to apply a discount to the entire group. For example, the first registrant pays full
price ($10) and the second registrant triggers a discount of 10%. In this example, the group would then owe $18 for two registrations. If you
want a 10% discount to apply only to the second registrant, enter 5% as the discount percentage.

If the group contact has lost or deleted the original email with the link to the group registrations, you can retrieve the link in Reports > Registrant Listing > Group Access URLs.
Comments
0 comments
Article is closed for comments.