
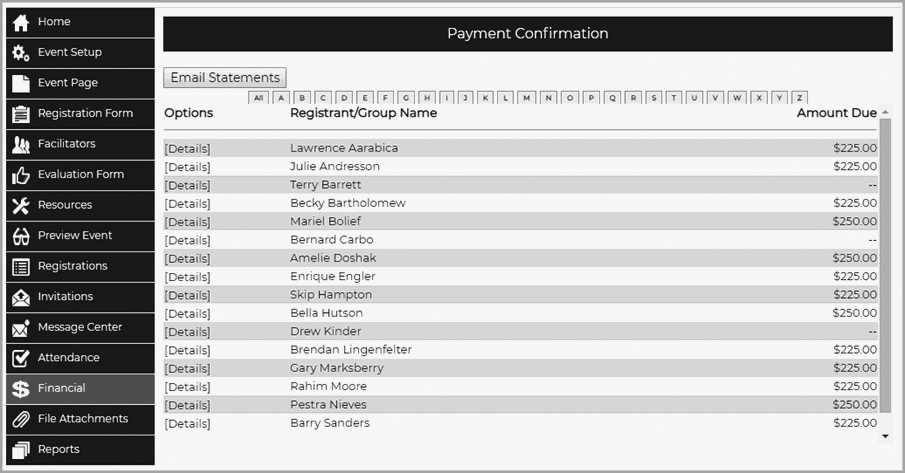
Track and update payments, credits, and balances due for individual registrations.
Viewing Registrant Details
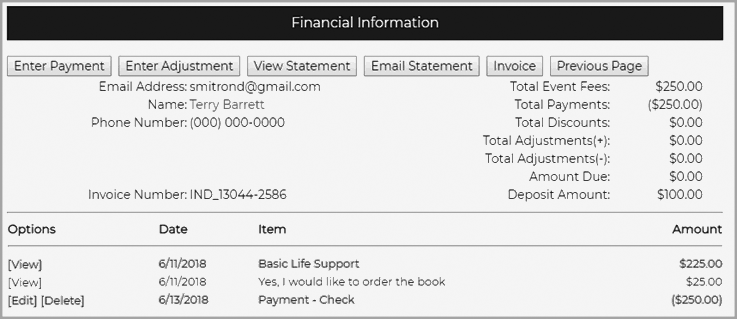
The Financial section on a class menu includes detailed data on registrant payments and amounts due. To view payment information for a registration, select the [Details] option next to a person's name. At the top of the details page, the registrant's contact info will be listed, along with the total charges for that specific registrant, their total payment, and the amount due. The specific items the registrant is being charged for (answers to registration questions) will be listed separately along with their cost and the date on which the total amount due was updated.
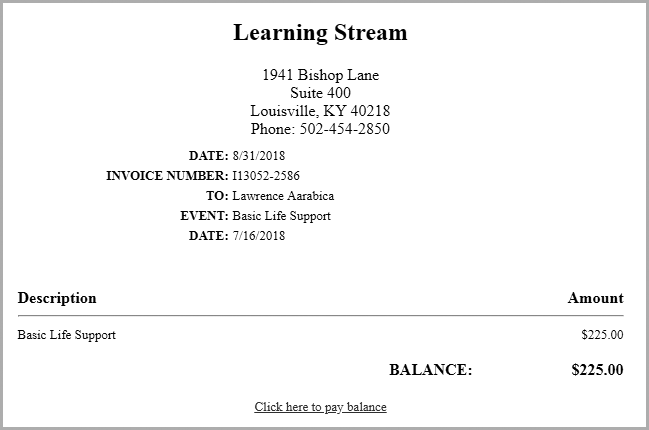
Invoice Number: Learning Stream can automatically add unique invoice numbers for chargeable events. Each registration creates a unique ID number that can also serve as an invoice number. With system administrator rights, you can activate this feature by going to "Allow invoice number assignment" in Application > Account > Parameters > Financial. You also can manually assign your own number invoice by invoice. If this option is activated, also in Application > Account > Parameters > Financial, you will see a link next to Invoice Number where you can insert the number.
If the registrant has generated credit, you will see a Transfer Credit button which allows you to transfer all or part of the possible refund amount to another event and registrant.
Entering a Payment
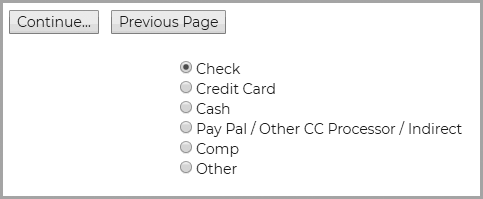
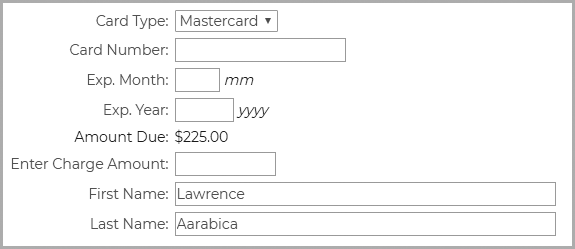
If you are accepting credit card payments using the system's normal process, such payments will be reflected automatically. If a registrant has made a payment and it needs to be entered into the system, click on "Enter Payment." This will bring up a screen listing several payment options. Select the registrant's form of payment and click on "Continue."
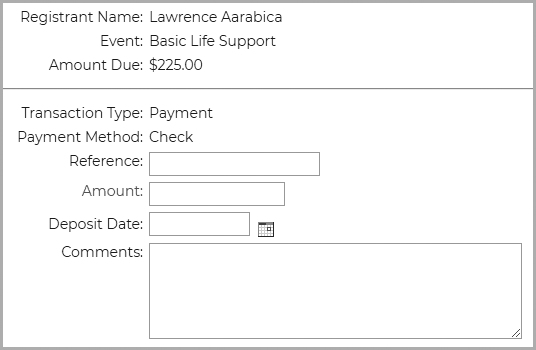
A new form will appear with the registrant's name, event, and amount due at the top. Under that is listed the Transaction type, which is a payment, and the payment method, which may be any of the above choices.
- Reference - This field may be used for a check number, or any other reference number needed to track the payment.
- Amount - The amount being paid in the transaction.
- Comments - Any comments about the transaction may be typed into this field.
You can enter credit card information for a person who has been registered internally, or who originally chose to pay by means other than a credit card. You cannot enter an amount higher than the total amount due, but you can enter a lesser amount.
To refund a credit card payment, click on the [Refund] link next to the credit card payment. Next, enter the amount of the refund and process the refund. How to Issue a Refund
Refunds may not be accepted on transactions older than 90 days depending on your financial institution. If a credit card payment is less than 24 hours old, the system may attempt to void the transaction instead of issuing a refund. This is required because the transaction may not have settled with your merchant account. Therefore, a refund would not process correctly.
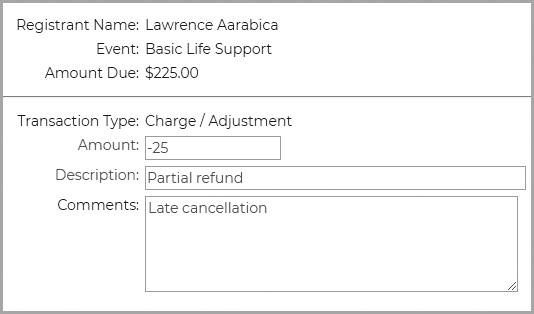
Entering a Charge or Adjustment
If a registrant has incurred a new charge or needs an adjustment on a payment, click on the "Enter Adjustment" button. This will bring up a form with the registrant's information at the top. The second half of the form will show the transaction type as a "Charge/Adjustment." The next three fields should be filled out as follows:
- Amount - Enter either the amount of the new charge or the amount of the adjusted charge in this field. If the registrant has been charged too much, enter a minus sign before the amount and it will be deducted from the amount due.
- Description - Enter a description of the new charge, or why the original charge is being adjusted.
- Comments - Enter any comments about this transaction in this text box.
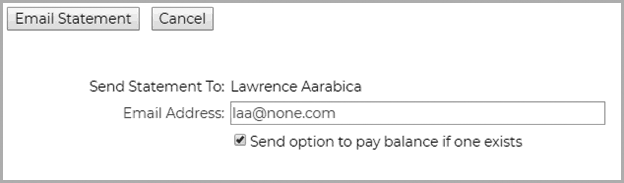
Viewing/Email Statement
In addition to viewing the most recent statement for a registrant, you can email it. Send the latest statement to a registrant from the Financial Information page for that registrant. Click Email Statement.
Pay a Balance via an Emailed Statement
When emailing a statement to an individual email address, you can include a link to pay the balance due by credit card. Click on the financial link for an individual's financial record within an event.

Click "Email Statement" at the top of the screen.

You can then check the box to include the link to the Pay Balance page.
The registrant will receive a statement with the Pay Balance link at the bottom.
This option is available only if your organization is accepting credit card payments for the event.
To add or edit text or other elements on the statement, incorporate the changes in your page theme. Under Interface > Page Themes, click to Edit the page theme, scroll down and click on the button that says Edit Statement Layout. It will look something like this:
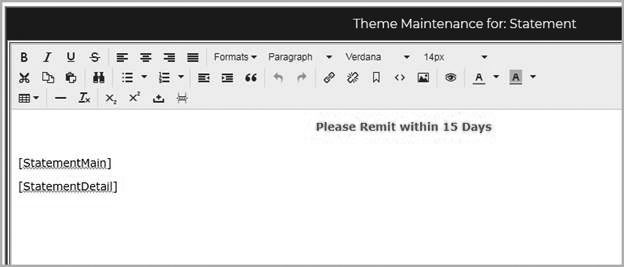
Make sure you leave the 2 tags for [StatementMain] and [StatementDetail]. Those are required for the statement to function properly.

Comments
0 comments
Article is closed for comments.